
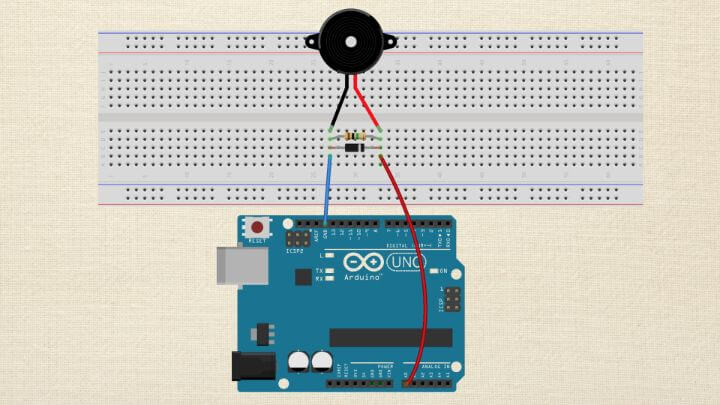
How to read voltages with analogRead()
In the last lesson you learned about using the analogRead() function to collect data from a sensor connected to one of the Arduino analog pins. The range of data we received from the analogRead() func...
12 Maalis 201714min
analogRead() and the Serial Port
Knowing if something is on or off can be extremely useful, but often you will want to know more. How bright is the light? How fast is the satellite moving? These types of answers are often analog – th...
11 Maalis 201712min
digitalRead() and the Serial Port
As simple as it may seem, knowing when something is either on or off can be a great tool for designing something useful. This lesson will answer the following questions: Is a button being pressed? Has...
10 Maalis 201721min
How to Blink an LED with Arduino
The first program you usually write when learning a new programming language is called, "Hello World". Its only function is to display the words "Hello World" on the computer monitor. When learning to...
9 Maalis 201714min
Understanding Variables
Let's have a discussion about a powerful and semi-confusing programming topic – variables. Arduino code variables are like buckets. You choose what types of stuff you want in the bucket and can change...
8 Maalis 201711min
Understanding Arduino Syntax
Arduino Code & Syntax Overview As you learned in Module 01, IDE stands for Integrated Development Environment. Pretty fancy sounding, and should make you feel smart any time you use it. The IDE is a t...
7 Maalis 201710min
Arduino IDE and Sketch Overview
IDE stands for Integrated Development Environment. Pretty fancy sounding, and should make you feel smart anytime you use it. The IDE is a text editor like program that allows you to write computer cod...
6 Maalis 20178min
Download & Install the Arduino IDE
One of the absolute best things about the Arduino IDE and platform is how easy it is to get started. The software that is installed on your computer is completely free and designed specifically for ea...
5 Maalis 20175min


